Flutter
Introduction
Using the native iOS/Android WebView implies some extra setup in your Flutter project. This setup involves incorporating the IntelliProve plug-in Mobile SDK files into your project dependencies for both iOS and Android and adding the necessary bridging code.
All this is nicely laid out in our step-by-step guide below.
The integration guide covers three sections:
- Setting up the iOS code
- Setting up the Android code
- Interfacing with the native code from Flutter (bridging)
GitHub
Our GitHub repository provides a fully functional example of our platform's integration, demonstrating the seamless setup and utilisation of our native SDKs for iOS and Android platforms.
Minimal Requirements
For this guide, we assume a minimal 'Hello World' application generated by the Flutter project initialisation.
1. iOS Framework Setup
Adding the framework
Last update 04/01/2026 13:40
- Add folder ios/Frameworks
- Copy the unzipped IntelliProveSDK.xcframework folder into this folder
- Open the ios/Runner.xcodeproj project in XCode
- Open Project Settings > General and in the Frameworks, Libraries, and Embedded Content section, add the IntelliProveSDK.xcframework that you copied above as a dependency
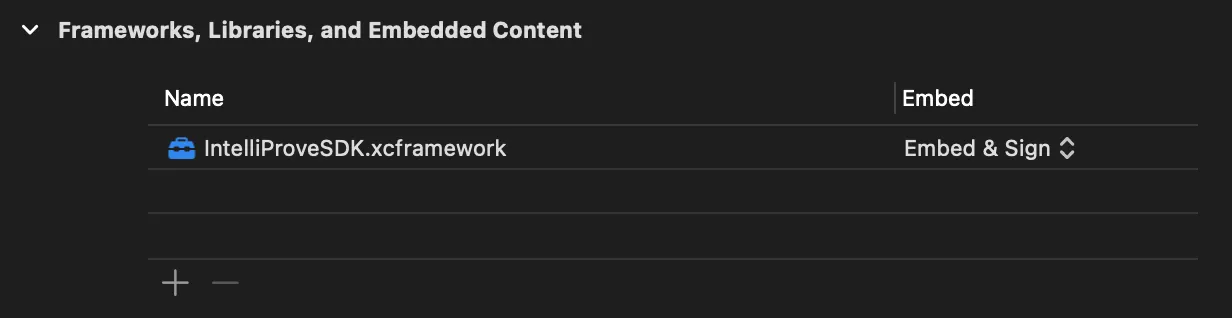
Setting up the project
- In Project Settings > Build Settings tab, verify that the iOS Deployment Target is set appropriately. The minimum supported version for the IntelliProveSDK is iOS 15.0
- Now open the Project Settings > Info tab to add the following Info.plist value:
- NSCameraUsageDescription - Add a String here that will be displayed when the application asks the user for Camera Usage permissions
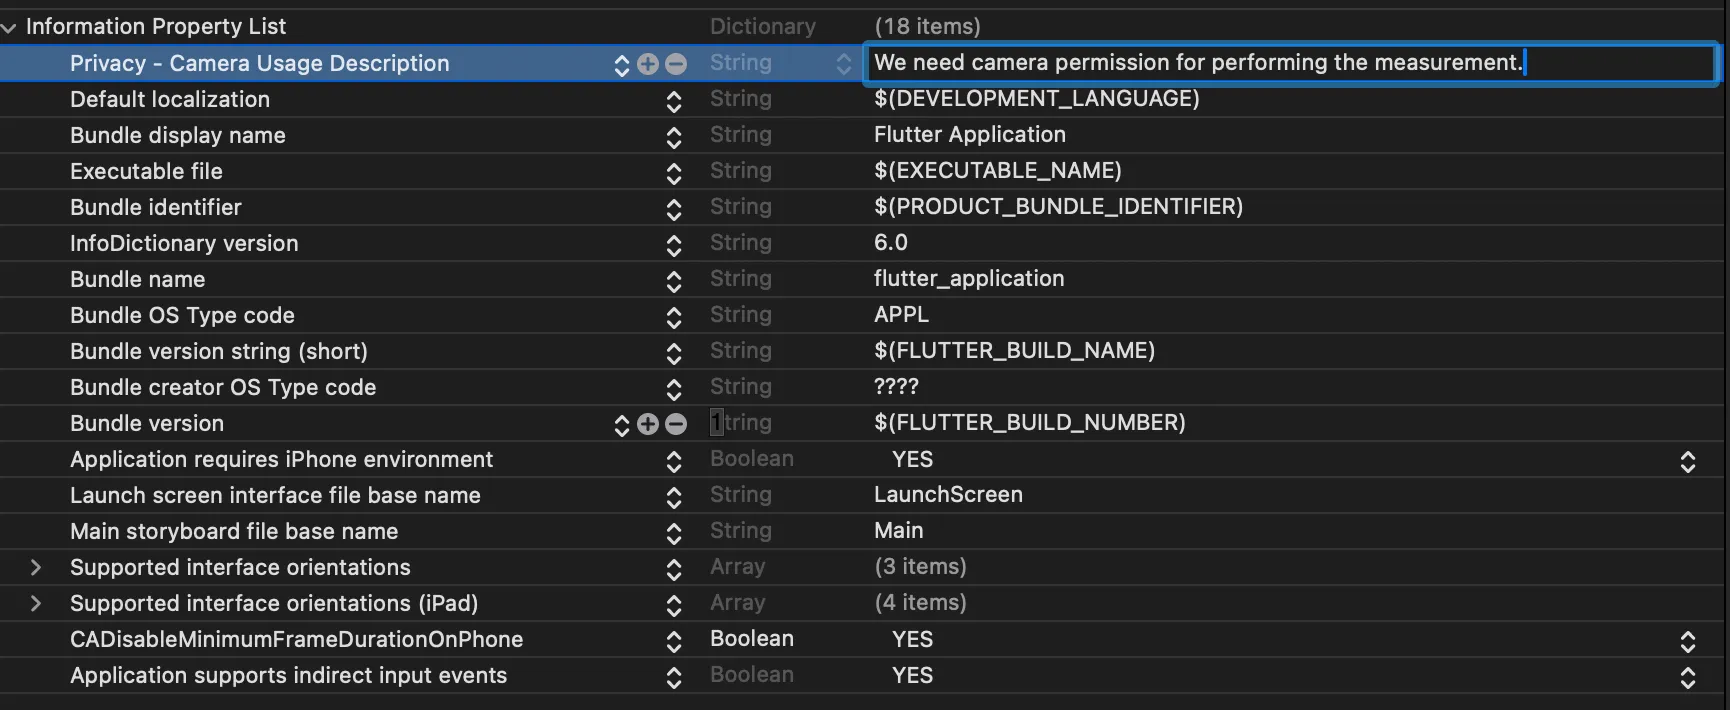
Updating the code
- In the project tree, open AppDelegate.swift, and add the following code:
// Add the IntelliProveSDK import
import IntelliProveSDK
...

// This is an example of how the AppDelegate may look, it may be defined differently in another project
@UIApplicationMain
@objc class AppDelegate: FlutterAppDelegate {
    override func application(
        _ application: UIApplication,
        didFinishLaunchingWithOptions launchOptions: [UIApplication.LaunchOptionsKey: Any]?
    ) -> Bool {
        GeneratedPluginRegistrant.register(with: self)

        // This registers a MethodChannel with your Flutter application.
        // The name is important, it must match the name of the channel in the *.dart file
        let controller : FlutterViewController = window?.rootViewController as! FlutterViewController
        let webviewChannel = FlutterMethodChannel(
            name: "com.intelliprove/webview",
            binaryMessenger: controller.binaryMessenger
        )

        // This registers a method call handler,
        // so the Native `openWebView()` function can be called from within the Flutter code
        webviewChannel.setMethodCallHandler({ [weak self] (call: FlutterMethodCall, result: FlutterResult) -> Void in
            if call.method == "openWebview" {
                if let args = call.arguments as? [String: Any],
                   let urlString = args["url"] as? String {
                    self?.openWebView(urlString: urlString)
                }
                result(nil)
            } else {
                result(FlutterMethodNotImplemented)
            }
        })

        return super.application(application, didFinishLaunchingWithOptions: launchOptions)
    }

    /// This function creates a new IntelliWebView using the Factory method,
    /// passing in the provided urlString, and setting the AppDelegate as a delegate for the IntelliWebView
    private func openWebView(urlString: String) {
        let webViewController = IntelliWebViewFactory.newWebView(urlString: urlString, delegate: self)
        webViewController.modalPresentationStyle = .fullScreen
        window?.rootViewController?.present(webViewController, animated: true)
    }
}

/// Implementation of the `IntelliWebViewDelegate` protocol
/// This dispatches received `PostMessage API` messages through to the Flutter application
extension AppDelegate: IntelliWebViewDelegate {
    func didReceive(postMessage: String) {
        let controller : FlutterViewController = window?.rootViewController as! FlutterViewController
        let webviewChannel = FlutterMethodChannel(
            name: "com.intelliprove/webview",
            binaryMessenger: controller.binaryMessenger
        )
        webviewChannel.invokeMethod("didReceivePostMessage", arguments: postMessage)
    }
}
2. Android Framework Setup
Adding the framework
Last update 16/09/2025 09:35
- All the following actions are taken in the android root folder of the Flutter project
- Add folder app/libs
- Copy the IntelliProveWebView.aar into this folder
- In app/build.gradle, add a dependency for the IntelliProveWebView.aarand androidx's AppCompatibility ConstraintLayout.
dependencies {
    ...
    implementation("androidx.constraintlayout:constraintlayout:2.1.4")
    implementation files('libs/IntelliProveWebView.aar')
}
Setting up the project
- In build.gradle, ensure the correct Kotlin version is used:
buildscript {
    ext.kotlin_version = '1.8.0'
    ...
}- In app/build.gradle, define the minSdkVersion:
android {
    ...
    defaultConfig {
        ...
        minSdkVersion 24
        ...
    }
    ...
}- In app/src/main/AndroidManifest.xml, add the needed permissions for Camera and Internet usage, and an activity tag, so the IntelliWebViewActivity can be shown in the application:
<manifest xmlns:android="http://schemas.android.com/apk/res/android">
    ...

    <uses-feature
        android:name="android.hardware.camera"
        android:required="false" />

    <uses-permission android:name="android.permission.INTERNET" />
    <uses-permission android:name="android.permission.CAMERA" />

    ...

    <application ...>
        ...
        <activity
            android:name="com.intelliprove.webview.IntelliWebViewActivity"
            android:theme="@style/Theme.AppCompat.NoActionBar"
            />
        ...
    </application>
</manifest>
Updating the code
- Now open the Activity from where the IntelliWebView will be triggered. In our example this is MainActivity.kt. Add the following code:
// Imports for the IntelliProve WebView
import com.intelliprove.webview.IntelliWebViewActivity
import com.intelliprove.webview.IntelliWebViewDelegate

// Imports for the Flutter MethodChannel bridging
import io.flutter.embedding.engine.FlutterEngine
import io.flutter.plugin.common.MethodChannel

...

// The MainActivity in our example also implements the `IntelliWebViewDelegate` interface
// That way it can receive callbacks from the Web App's `PostMessage API`
class MainActivity(private var webViewChannel: MethodChannel? = null): FlutterActivity(), IntelliWebViewDelegate {
    override fun configureFlutterEngine(flutterEngine: FlutterEngine) {
        super.configureFlutterEngine(flutterEngine)

        // We keep the MethodChannel bridge to Flutter on a member
        // Make sure to use the same name as in the Flutter App code
        webViewChannel = MethodChannel(
            flutterEngine.dartExecutor.binaryMessenger,
            "com.intelliprove/webview"
        )

        // Add a MethodCallHandler to react to the trigger and show the WebView sent from the Flutter App code
        webViewChannel?.setMethodCallHandler { call, result ->
            if (call.method == "openWebview") {
                val args = call.arguments as? Map<*, *>
                val urlString = args?.get("url") as? String
                urlString?.let {
                    openWebView(it)
                }
                result.success(null)
            } else {
                result.notImplemented()
            }
        }
    }

    private fun openWebView(urlString: String) {
        IntelliWebViewActivity.start(this, urlString, this)
    }

    override fun didReceivePostMessage(postMessage: String) {
        runOnUiThread {
            webViewChannel?.invokeMethod("didReceivePostMessage", postMessage)
        }
    }
}
3. Flutter Integration
While many possibilities exist to bridge the gap between Native iOS/Android and Flutter, this document serves as a guide to integrating the IntelliProveSDK into a Flutter application project.
To be able to call functions on, and receive callbacks from the Native application, we can implement a MethodChannel in the Flutter Application.
- Open main.dart (or wherever in the Flutter app that the IntelliProve web view will be used)
- Add the following imports:
import 'package:flutter/services.dart'; // To use MethodChannel
import 'dart:convert'; // To convert the received JSON String to a dictionary- Add a MethodChannel with a method to open the IntelliWebView. In our example we add it as a static const on our State<HomePage> implementation.
- Also add a callback handler for receiving 'PostMessage' messages.
- The post messages allow you to track the progress of the Face Scan and obtain the results from the IntelliProve plug-in immediately after the user has performed the Face Scan. This allows you to use the results in your mobile app, enabling you to link actions to the results or design a custom results screen.
- You can find an overview of the different types of messages on the Message events page.
// Make sure the name of the MethodChannel matches the one used in the Native App code
static const platform = MethodChannel('com.intelliprove/webview');

@override
void initState() {
    super.initState();
    platform.setMethodCallHandler(handleNativeCallback);
}

void openWebView(String url) async {
    try {
        // Make sure the method name also matches the one registered in Native App code
        await platform.invokeMethod('openWebview', {'url': url});
    } on PlatformException catch (e) {
        print("Failed to open webview: ${e.message}");
    }
}

Future<void> handleNativeCallback(MethodCall call) async {
    if (call.method == 'didReceivePostMessage') {
        String postMessage = call.arguments;
        print("Flutter PostMessage Full Body: $postMessage");

        // postMessage is received as JSON string, so we need to parse it
        Map<String, dynamic> postData = jsonDecode(postMessage);
        String stage = postData['stage'];
        print("Flutter PostMessage Stage: $stage");
    }
}- Finally, call the openWebView(...) function from wherever the entry point to the WebView should be.
- The URL to open the IntelliProve Face Scan Plug-in (webapp) is also added to this function. In our example, it is added on a Button press handler.
- Make sure to request the URL for the Face Scan plug-in using the Get Face Scan URL API endpoint.
ElevatedButton(
    onPressed: () => openWebView('https://<subdomain>.intelliprove.com/...'),
    child: Text('Open WebView'),
)
The WebView is automatically dismissed by the SDK when receiving the dismiss post message.
Next steps
- To match the plug-in with your brand's colours and fonts, please visit our UI Customization documentation.