ReactNative
Introduction
Using the native iOS/Android WebView implies some extra setup in your ReactNative project. This setup involves incorporating the IntelliProve plug-in Mobile SDK files into your project dependencies for both iOS and Android and adding the necessary bridging code.
All this is nicely laid out in our step-by-step guide below.
The integration guide covers three sections:
- Setting up the iOS code
- Setting up the Android code
- Interfacing with the Native code from ReactNative (bridging)
GitHub
Our GitHub repository provides a fully functional example of our platform's integration, demonstrating the seamless setup and utilisation of our native SDKs for iOS and Android platforms.
Minimal Requirements
For this guide, we assume a minimal 'Hello World' application generated by the ReactNative project initialisation.
1. iOS Framework Setup
Adding the framework
Last update 04/01/2026 13:40
- Add folder ios/Frameworks
- Copy the unzipped IntelliProveSDK.xcframework folder into this folder
- Open the ios/[PROJECT_NAME].xcodeproj project in XCode
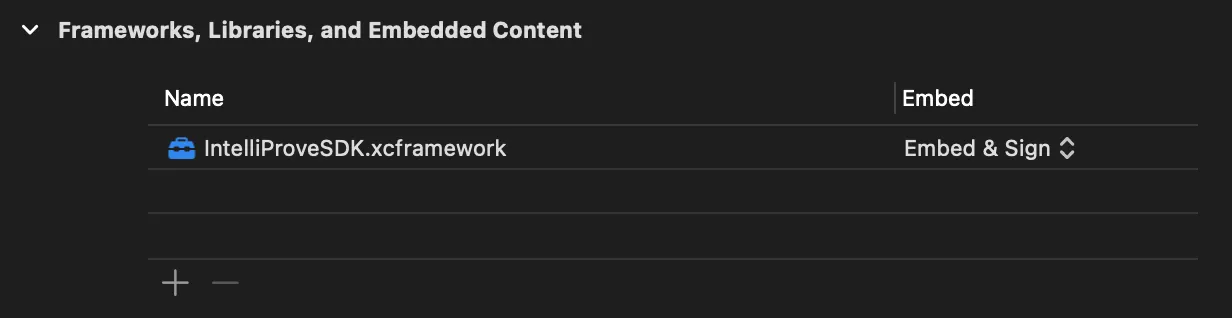
- Open Project Settings > General and in the Frameworks, Libraries, and Embedded Content section, add the IntelliProveSDK.xcframework that you copied above as a dependency
Setting up the project
- In Project Settings > Build Settings tab, verify that the iOS Deployment Target is set appropriately. The minimum supported version for the IntelliProveSDK is iOS 15.0
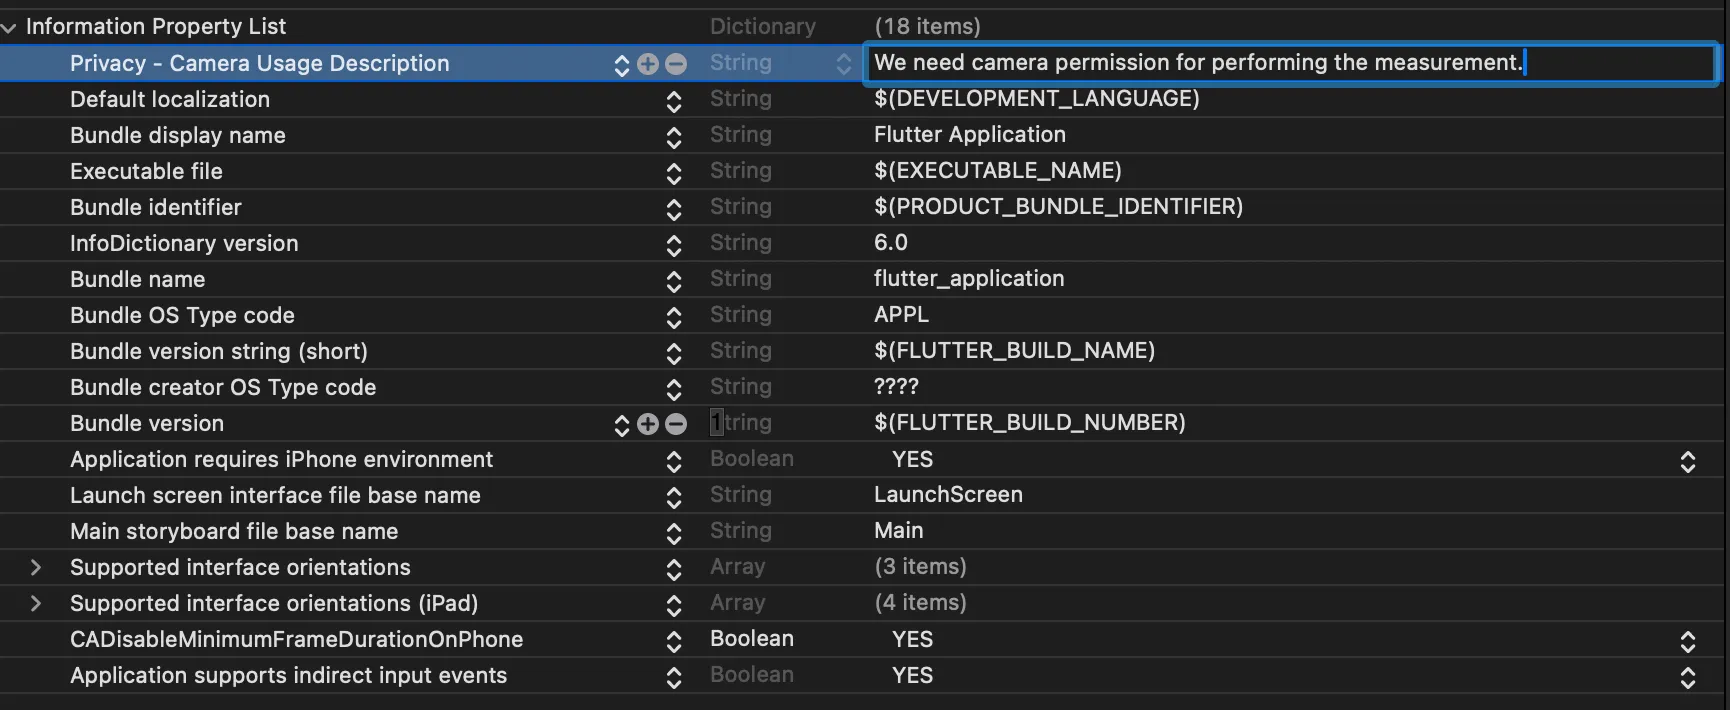
- Now open the Project Settings > Info tab to add the following Info.plist value:
- NSCameraUsageDescription - Add a String here that will be displayed when the application asks the user for Camera Usage permissions
Updating the code
- In the project tree, add a new header file called WebViewModule.h, and add the following code:
#import <React/RCTEventEmitter.h>

// We create a ReactNative Module that can bridge from React to iOS, but also is an Event Emitter to post back to React
@interface WebViewModule: RCTEventEmitter

@end- Next to that file, add an ObjectiveC file WebViewModule.m:
#import "WebViewModule.h"
#import "AppDelegate.h"

// Add the IntelliProveSDK import
#import "IntelliProveSDK/IntelliProveSDK-Swift.h"

#import <SwiftUI/SwiftUI.h>
#import <React/RCTBridge.h>

@interface WebViewModule () <IntelliWebViewDelegate>
@end

@implementation WebViewModule

// We export this class as a Module to ReactNative
RCT_EXPORT_MODULE();

// We add an event name for the Post Message and register it.
// The name is important, it must match the name of the event in the *.tsx file
NSString *postMessageEvent = @"IntelliWebViewPostMessage";

- (NSArray<NSString *> *)supportedEvents {
  return @[postMessageEvent];
}

/// This function creates a new IntelliWebView using the Factory method,
/// passing in the provided urlString, and setting this class as a delegate for the IntelliWebView
/// It then presents this web view on top of the Window's rootViewController
/// This function is exported so it can be used from within ReactNative code
RCT_EXPORT_METHOD(presentWebView:(NSString *)urlString) {
  dispatch_async(dispatch_get_main_queue(), ^{
    UIViewController *rootViewController = [UIApplication sharedApplication].delegate.window.rootViewController;
    UIViewController *webViewController = [IntelliWebViewFactory newWebViewWithUrlString:urlString delegate:self];
    webViewController.modalPresentationStyle = UIModalPresentationFullScreen;
    [rootViewController presentViewController:webViewController animated:YES completion:nil];
  });
}

/// Implementation of the `IntelliWebViewDelegate` protocol
/// This dispatches received `PostMessage API` messages through to the ReactNative application
- (void)didReceiveWithPostMessage:(NSString *)postMessage {
  // Pass message to React App through an event
  [self sendEventWithName:postMessageEvent body:postMessage];
}

@end- Now open AppDelegate.m in the project tree and add the registerWebViewModule method as described below (note the changes in the applicationselector):
#import <React/RCTBundleURLProvider.h>
#import <React/RCTBridge.h>

// This is an example of how the AppDelegate may look, it may be defined differently in another project
@implementation AppDelegate

- (BOOL)application:(UIApplication *)application didFinishLaunchingWithOptions:(NSDictionary *)launchOptions
{
  self.moduleName = @"PROJECT_NAME";
  self.initialProps = @{};
  BOOL result = [super application:application didFinishLaunchingWithOptions:launchOptions];

  // Register the WebViewModule
  [self registerWebViewModule];

  return result;
}

...

// This registers a NativeModule with the ReactNative application.
// The name is important, it must match the name of the NativeModule in the *.tsx file
- (void)registerWebViewModule
{
  RCTBridge *bridge = self.bridge;

  if (bridge) {
    [bridge moduleForName:@"WebViewModule"];
  }
}

@end
2. Android Framework Setup
Adding the framework
Last update 15/09/2025 09:35
- All the following actions are taken in the android root folder of the ReactNative project
- Add folder app/libs
- Copy the IntelliProveWebView.aar into this folder
- In app/build.gradle, add a dependency for the IntelliProveWebView.aarand androidx's AppCompatibility ConstraintLayout.
dependencies {
    ...
    implementation("androidx.constraintlayout:constraintlayout:2.1.4")
    implementation files('libs/IntelliProveWebView.aar')
}
Setting up the project
- In build.gradle (not app/build.gradle), ensure the correct Kotlin version is used, and define the minSdkVersion:
buildscript {
    ext {
        minSdkVersion = 24
        kotlinVersion = "1.8.0"

    }
    ...
}- In app/src/main/AndroidManifest.xml, add the needed permissions for Camera and Internet usage, and an activity tag, so the IntelliWebViewActivity can be shown in the application:
<manifest xmlns:android="http://schemas.android.com/apk/res/android">
    ...

    <uses-feature
        android:name="android.hardware.camera"
        android:required="false" />

    <uses-permission android:name="android.permission.INTERNET" />
    <uses-permission android:name="android.permission.CAMERA" />

    ...

    <application ...>
        ...
        <activity android:name="com.intelliprove.webview.IntelliWebViewActivity" />
        ...
    </application>
</manifest>
Updating the code
- Find the folder where the MainApplication of the project is located (for example: app/src/main/java/[packagename]/MainApplication.kt
- Now we'll add the React NativeModule that acts as a bridge between ReactNative and Android, add a new file WebViewModule.kt in this same folder:
// Use your package name here
package com.<PACKAGE_NAME>

import android.content.Context

// Imports for ReactNative's bridging
import com.facebook.react.bridge.JavaScriptModule
import com.facebook.react.bridge.ReactApplicationContext
import com.facebook.react.bridge.ReactContextBaseJavaModule
import com.facebook.react.bridge.ReactMethod
import com.facebook.react.modules.core.DeviceEventManagerModule

// Imports for the IntelliProve WebView
import com.intelliprove.webview.IntelliWebViewActivity
import com.intelliprove.webview.IntelliWebViewDelegate

class WebViewModule(reactContext: ReactApplicationContext) : ReactContextBaseJavaModule(reactContext), IntelliWebViewDelegate,
    JavaScriptModule {
    // This defines the name of the NativeModule
    // Make sure to use the same name as in the ReactNative App code
    override fun getName(): String {
        return "WebViewModule"
    }

    // Add a ReactMethod to react to the trigger and show the WebView sent from the ReactNative App code
    @ReactMethod
    fun presentWebView(urlString: String) {
        currentActivity?.let {
            IntelliWebViewActivity.start(it, urlString, this)
        }
    }

    // This is the implementation of the `IntelliWebViewDelegate` interface
    // That way it can receive and emit callbacks from the Web App's `PostMessage API` to ReactNative
    override fun didReceivePostMessage(postMessage: String) {
        reactApplicationContext
            .getJSModule(DeviceEventManagerModule.RCTDeviceEventEmitter::class.java)
            .emit("IntelliWebViewPostMessage", postMessage)
    }
}- In the same folder still, add another file IntelliReactPackage.kt to register the WebViewModule on the application in a 'ReactPackage':
// Use your package name here
package com.<PACKAGE_NAME>

import android.content.Context
import android.view.View
import com.facebook.react.ReactPackage
import com.facebook.react.bridge.NativeModule
import com.facebook.react.bridge.ReactApplicationContext
import com.facebook.react.uimanager.ReactShadowNode
import com.facebook.react.uimanager.ViewManager

class IntelliReactPackage : ReactPackage {
    override fun createNativeModules(reactContext: ReactApplicationContext): MutableList<NativeModule> {
        val modules = mutableListOf<NativeModule>()
        modules.add(WebViewModule(reactContext))
        return modules
    }

    override fun createViewManagers(p0: ReactApplicationContext): MutableList<ViewManager<View, ReactShadowNode<*>>> {
        return emptyList<ViewManager<View, ReactShadowNode<*>>>().toMutableList()
    }
}- Finally, open the MainApplication.kt that initializes the ReactNative application in Android. Add the following code to register the Package we created above:
...

import com.<PACKAGE_NAME>.IntelliReactPackage

class MainApplication : Application(), ReactApplication {

  override val reactNativeHost: ReactNativeHost =
      object : DefaultReactNativeHost(this) {
        override fun getPackages(): List<ReactPackage> {
          PackageList(this).packages.apply {
            // Packages that cannot be autolinked yet can be added manually here, for example:
            // add(MyReactNativePackage())
            add(IntelliReactPackage())
          }
        }

        ...
      }

    ...
}
3. ReactNative Integration
While many possibilities exist to bridge the gap between Native iOS/Android and ReactNative, this document serves as a guide to integrating the IntelliProveSDK into a ReactNative application project.
To be able to call functions on, and receive callbacks from the Native application, we can implement NativeModules in the ReactNative Application.
- Open App.tsx (or wherever in the ReactNative app that the IntelliProve web view will be used)
- Add the following imports:
// For registering the event listener
import { useEffect } from 'react';
import {
  NativeModules, // To use NativeModules, so we can call Native functions
  NativeEventEmitter, // To register EventEmitters, so we can respond to events from Native code
} from 'react-native';- Also add a callback handler for receiving 'PostMessage' messages.
- The post messages allow you to track the progress of the Face Scan and obtain the results from the IntelliProve plug-in immediately after the user has performed the Face Scan. This allows you to use the results in your mobile app, enabling you to link actions to the results or design a custom results screen.
- You can find an overview of the different types of messages on the Message events page.
- Finally, we call the handleOpenWebView()function from wherever the entry point to the WebView should be.
- The URL to open the IntelliProve Face Scan Plug-in (webapp) is also added to this function. In our example, it is added on a Button press handler.
- Make sure to request the URL for the Face Scan plug-in using the Get Face Scan URL API endpoint.
function App(): React.JSX.Element {
  const handleOpenWebView = () => {
    NativeModules.WebViewModule.presentWebView('https://<subdomain>.intelliprove.com/...');
  };

  // Add Event Listener for IntelliWebViewPostMessage API
  useEffect(() => {
    // Subscribe to the event when the App component mounts
    const eventEmitter = new NativeEventEmitter(NativeModules.WebViewModule);
    // Make sure the name of the listener matches what was used on Native code
    const subscription = eventEmitter.addListener('IntelliWebViewPostMessage', (postMessage) => {
      // Handle the received postMessage
      console.log('ReactNative PostMessage Full Body:', postMessage);

      try {
        // The PostMessage is received as a JSON String, so we need to parse it
        const parsedMessage = JSON.parse(postMessage);
        if (parsedMessage && parsedMessage.stage) {
          console.log('ReactNative PostMessage Stage:', parsedMessage.stage);
        } else {
          console.warn('ReactNative invalid PostMessage format:', parsedMessage);
        }
      } catch (error) {
        console.error('ReactNative error parsing PostMessage:', error);
      }
    });

    // Unsubscribe from the event when the component unmounts
    return () => {
      subscription.remove();
    };
  }, []); // Empty dependency array means this effect runs once when the component mounts

  ...

  return (
    ...
    <Button title="Open WebView" onPress={handleOpenWebView} />
    ...
  )
}
The WebView is automatically dismissed by the SDK when receiving the dismiss post message.
Next steps
- To match the plug-in with your brand's colours and fonts, please visit our UI Customization documentation.