Getting started
This guide walks you through the essential steps to implement IntelliProve's Face Scan. By the end, you will have implemented a working integration that enables users to perform health scans and view their results, all inside your platform. The Face Scan plug-in is used for seamless integration of the scanning interface.
Key objects in IntelliProve
Four primary types of objects are central to IntelliProve's functionality:
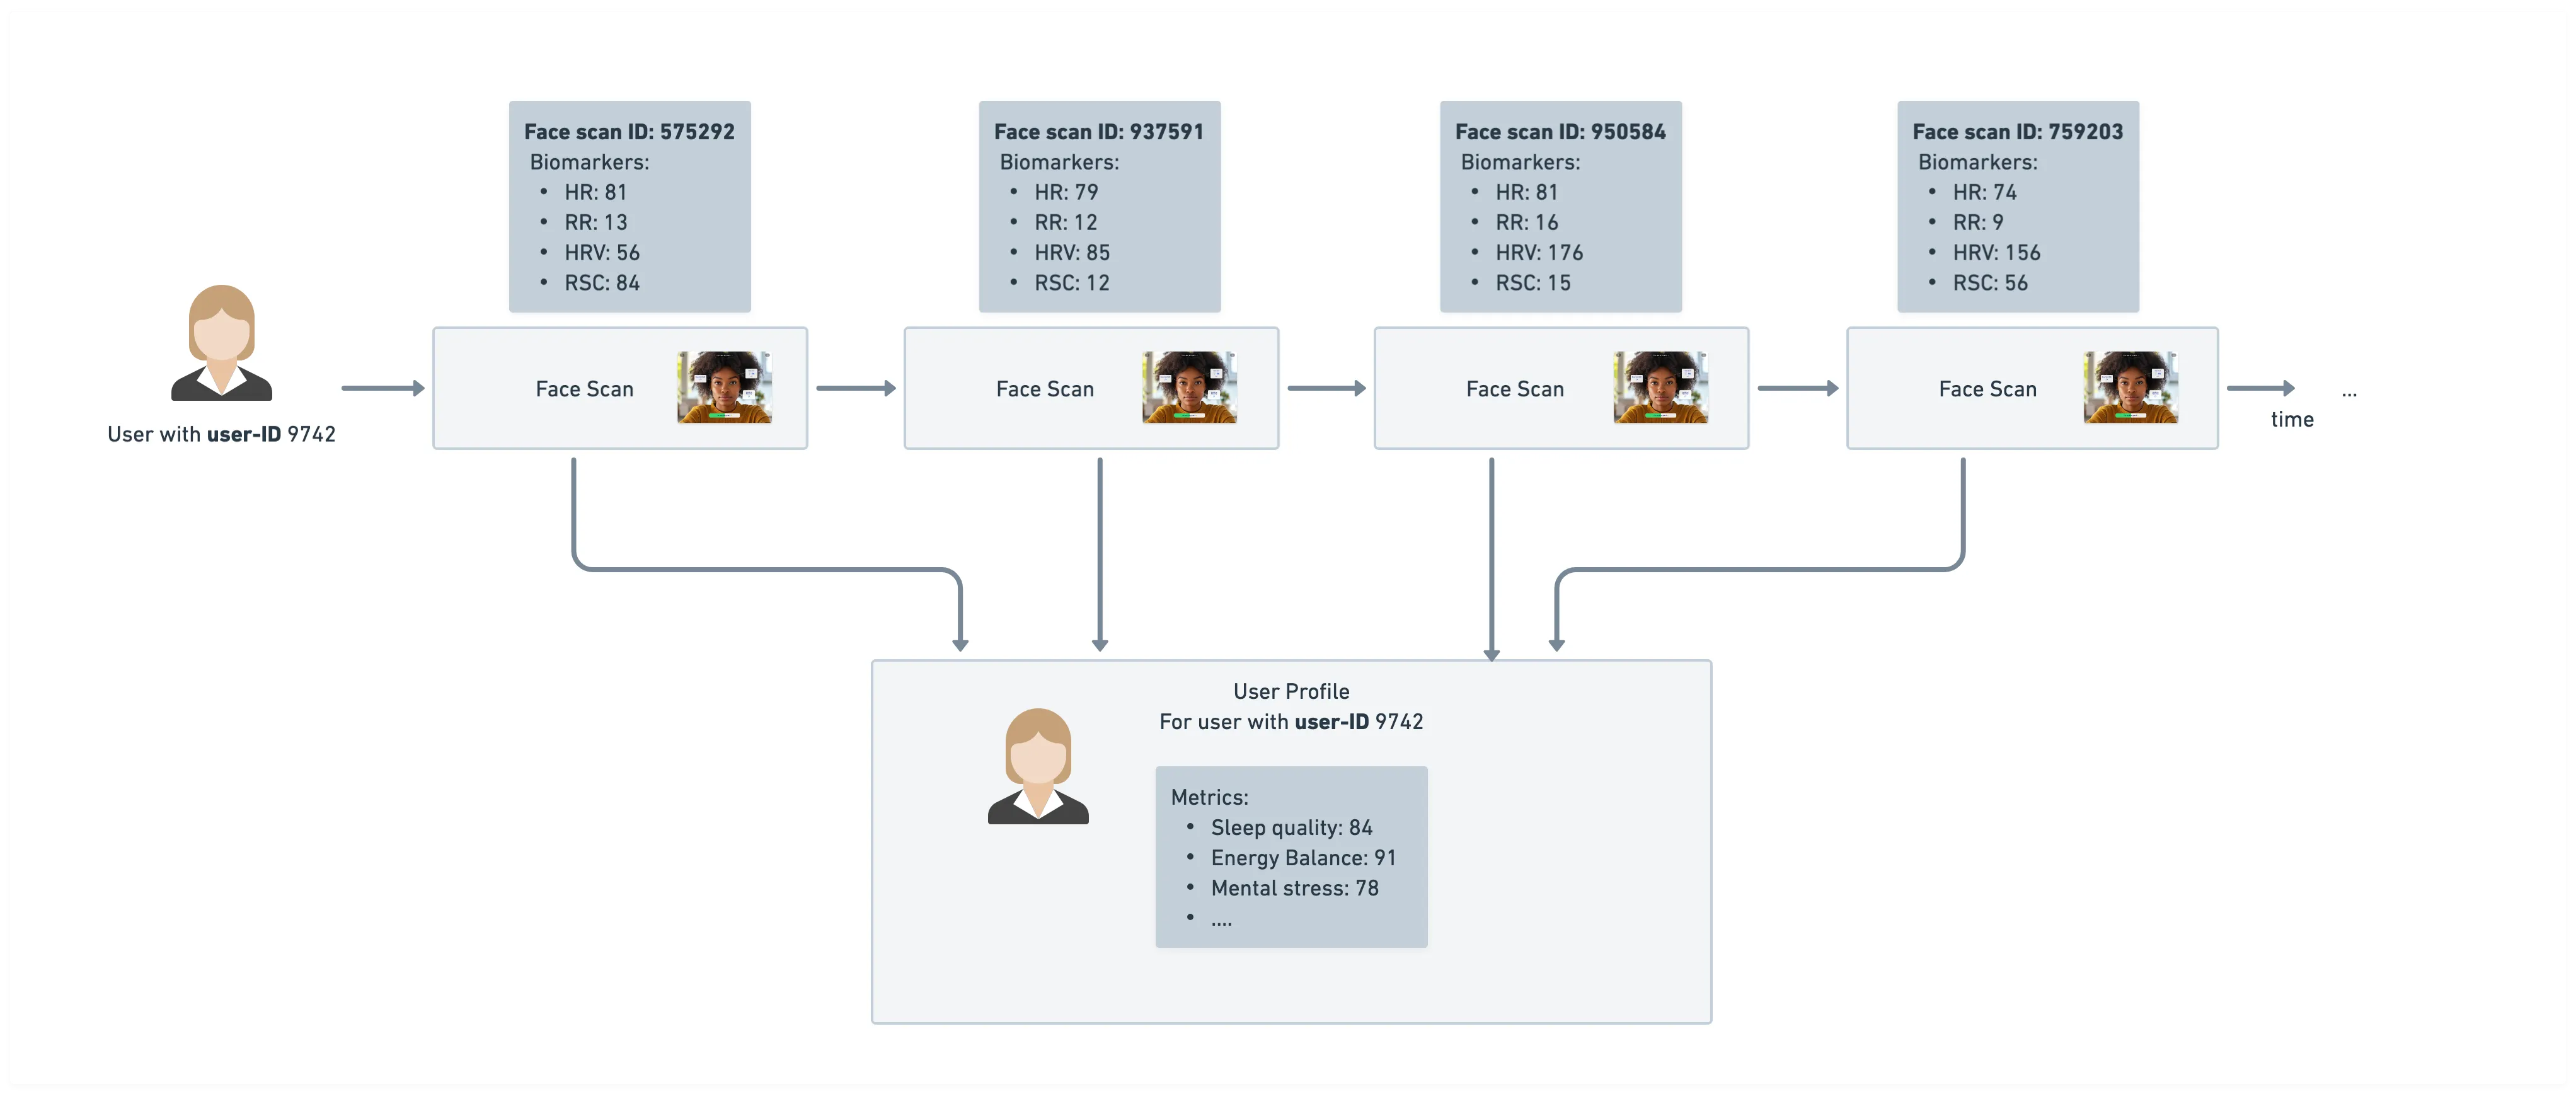
- User: Represents a unique end-user accessing IntelliProve's services. Each User must be created once, enabling IntelliProve to track their Face Scans and build a personalized User Health Profile. Read more about the user object →
- Face Scan: Refers to a single scan performed by a user. Each scan is identified by a unique Face Scan ID. Read more about the Face Scan →
- Biomarkers: Biomarkers are Health Insights associated with a single Face Scan. They are measurable, objective physiological indicators. Read more about the Biomarkers →
- Metrics: Metrics are interpreted Health Insights derived from the analysis of multiple Face Scans and incorporating contextual information. Read more about the Metrics →
By associating Face Scans with users, IntelliProve ensures accurate tracking and meaningful Health Insights. The relationships between these objects are illustrated in the figure below.
Integrating the Face Scan
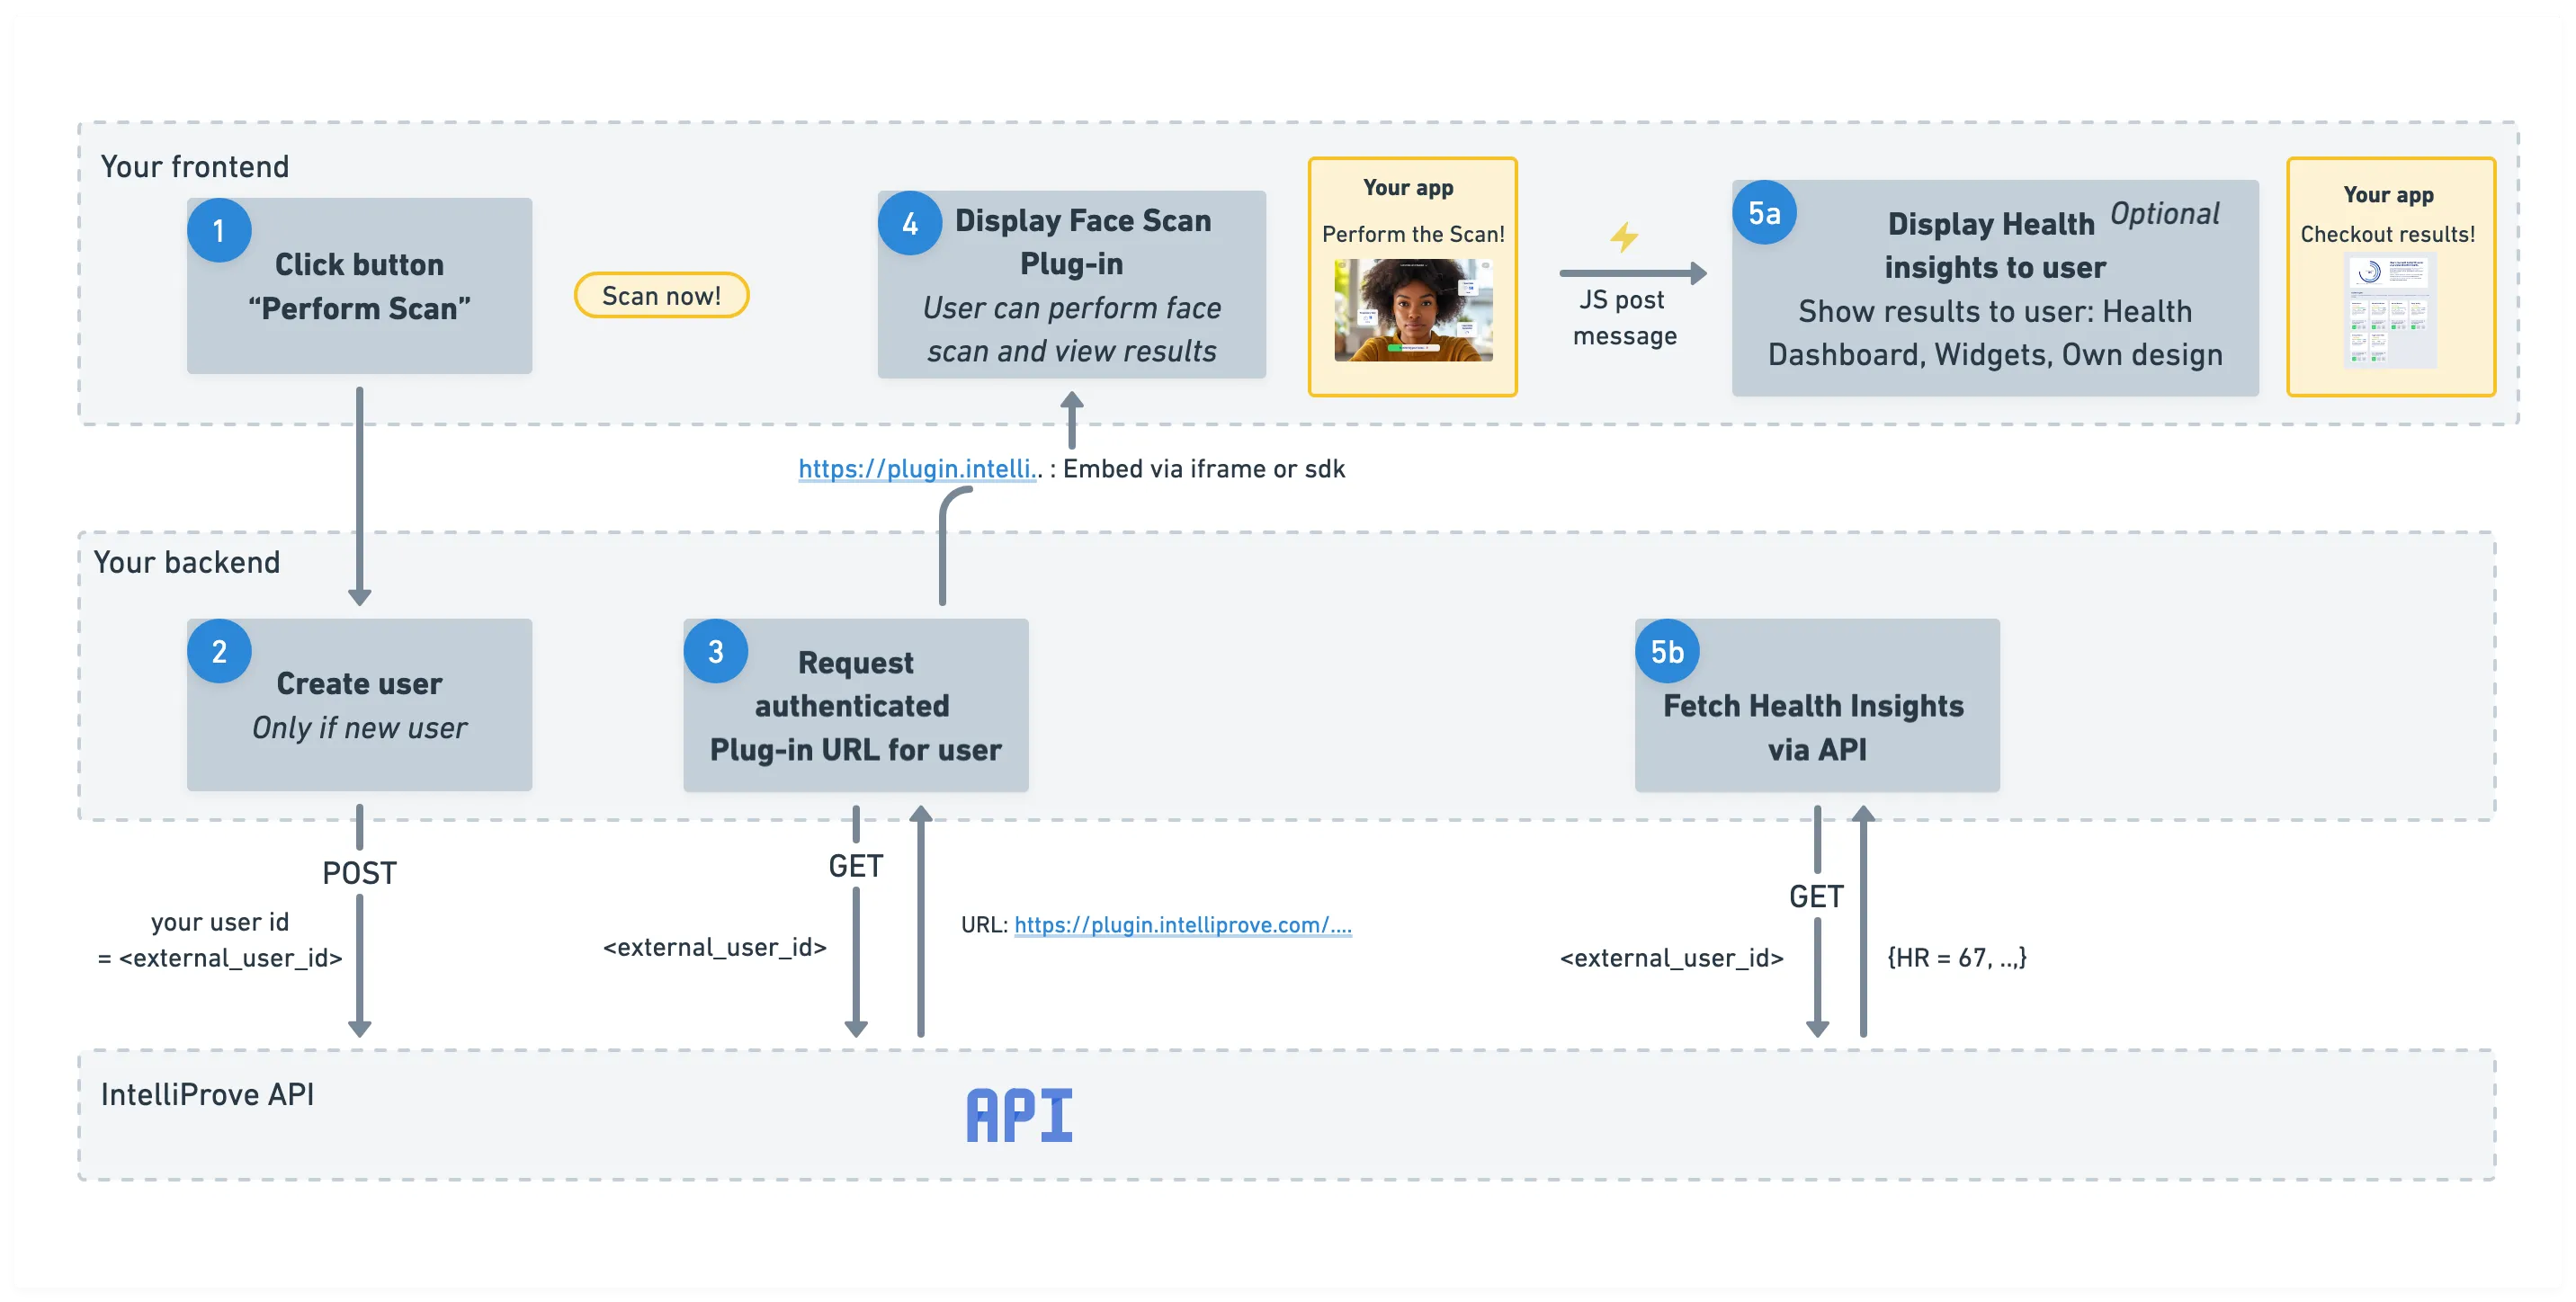
Follow the 5 steps detailed below to integrate the Face Scan. If you haven't already, create an API key in the admin console.
1. "Perform scan" button
Add a clear call-to-action (CTA) button in your app’s frontend that allows users to start a Face Scan.
When the user clicks this button, you’ll need to execute a few steps to display the plug-in correctly. These steps include:
- creating a user
- requesting an authenticated plug-in URL
- embedding the plug-in in your frontend
Each of these steps is explained in detail below.
2. Create user
Each Face Scan must be linked to a user. IntelliProve identifies a user using a unique external_user_id – an identifier you choose.
Before requesting a Face Scan URL, ensure the user exists. You can either:
- check via the Get user details API endpoint, or
- simply attempt to create the user. If the user already exists, the API will return the stored User record.
To create a user, call the API with your chosen external_user_id. The response includes IntelliProve’s internal user_id, a pseudonymized identifier used to track Face Scans and Health Profiles. IntelliProve does not store personally identifiable information such as names or national identifiers.
You can use either external_user_id or user_id in subsequent API calls.
POST /v2/users Create a new user using the API →
3. Request Face Scan plug-in URL
To display the Face Scan plug-in in a web or mobile app, you must request an authenticated URL linked to the user.
Provide your external user ID to the API, and it will return a URL that:
- is tied to the specific user
- collects results under that user's profile
- is valid for 6 hours
Important: request a new URL for every new user session. One URL = one user session.
GET /v2/userjourneys/scan Request the plug-in URL using the API →
4. Display and hide the Face Scan plug-in
Use the URL returned in the previous step to embed the Face Scan plug-in into your app.
You can integrate the plug-in using:
- an iFrame, or
- one of IntelliProve’s SDKs, depending on your platform
We provide detailed guides to embed the plug-in, based on your platform. Go to the 'Embed plug-in' documentation →
Once embedded, users can perform their first Face Scan!
Dismissing the plug-in
When a scan is completed, the plug-in sends a postMessage event to the parent app so you can hide/dismiss the plug-in and continue your flow.
Postmessages safely enable cross-origin communication between Window objects and allow your app to stay up-to-date on progress within the Face Scan plug-in. Go to the 'message events' documentation →
5. Visualize Health Insights
Once scans are performed, you can present Health Insights to your users or request the raw results data. IntelliProve offers several integration options, which you can also combine depending on your needs.
Fastest option: the Health Dashboard Embed a complete dashboard that visualizes Biomarkers and Metrics with minimal setup – similar to embedding the Face Scan plug-in.
Flexible option: widgets Use our IntelliWidgets, prebuilt UI components that behave like modular tiles, allowing for a more tailored presentation of the results.
Full custom option: API Use our API to access raw results data. This lets you integrate the outputs into your own backend logic, trigger follow-up actions, or feed them into your recommendation engine or other analysis workflows.
The ideal approach for visualizing Health Insights depends on your use case and application. We provide detailed guides for each option.
Customizing the UI
You can customize the styling and appearance of the plug-in and widgets to match your platform.